Wednesday, July 25, 2012

Roasted Radishes

Once upon a time, I got some radishes in my CSA. I admit - I do not like radishes. When I was little, sometimes I'd take one out of the garden and draw on our white fences with it. It leaves a pretty pink mark. I do give radishes that; they are quite pretty. In any case, I looked for a way to eat these without being sad, and I found something! Roasting them is quick and simple, and they taste great. Success! I roughly followed this recipe from Bon Appetit, found with my Epicurious app. Here's what I did:
  • Preheat oven to 400F (This ended up being a bit hot - I will do 375F next time)
  • Use small radish quarters - mine were about the size of a quarter or golden dollar.
    • I also used some summer squash - cut these into small circle or semi-circles.
  • Spray baking sheet with olive oil lightly, arrange radishes, spray these as well.
    • Don't add squash yet.
    • If you don't have a mister, you can toss the radishes in a bowl with a little olive oil.
  • Bake radishes for 7 minutes, stir them a bit to get different sides to brown, add squash, bake 7 more minutes.
  • Add a little salt or seasoning! I used some green onions cooked in my lemon balm compound butter for a dressing - it was wonderful! I ate a few radishes before coating them, and they were great - many possibilities.
Here's the photos!

Little radishes - I probably had about a cup's worth

This one was the tiniest - so cute!

A few green onions to cook in the compound butter.

Radishes ready for roasting.

Squash!

I melted the compound butter on low.

Radishes halfway done, turned, squash added.

Sliced green onion cooking on low in the compound butter - amazing!

Roasted vegetables getting ready to be mixed with onions and butter.

Pretty!


And delicious :)

Monday, July 23, 2012

Lemon Balm Compound Butter

I have always wanted to try making compound butter, and when looking for ways to use my CSA lemon balm, it appeared as an option. It's fairly simple, so there's not a lot to say...my recipe is derived from two recipes I found online. I have so far used it for mashed potatoes, onions (which were added to radishes), and ravioli. It's a nice, easy thing to have around to give recipes an extra oomph. I don't know that the flavor of the lemon balm stood out against the garlic, but it did add visual interest.

Ingredients - makes ~4 tbsp
  • 1/4 cup butter, softened
  • 2 tbsp lemon balm
  • 1/2 tsp garlic powder (I didn't have any fresh on hand, but this worked well)
  • 1/8 tsp salt
Butter softening - I cut into pieces to help the process

Salt and garlic powder mixed in

Pretty lemon balm!

Leaves pulled off, ready to chop

This is how fine I chops things...might be a bit on the fine side.

Lemon blam mixed in! You could also do this in a food processor.


Put it in a little plastic container, and it can be used for a few days in the fridge, or frozen for the future!

Saturday, July 14, 2012

Crab Cakes!

My dinner plan that night was to have asparagus and flavored rice. I had had several packets of flavored rice forever, and was going to finally use them. Sadly, both had been destructed by moths. I have never had a issue with moths until this year. I seem to have eradicated them, but occasionally will find their destruction. Who knew moths ate food? Well, one type, anyways. Don't go killing every moth you see, just these ones. Anyways, in searching for something else to eat with my asparagus, I found a can of crab meat...maybe I can make crab cakes! I pulled out my Old Bay seasoning box, and indeed, there was a recipe: Chesapeake Old Bay Crab Cakes. Upon looking at the website, I also found this one...sounds good, too. Perhaps I will try that one someday.
  • The can of crab meat was only a 1/4 lb, so I quartered everything in the recipe, with the exception of the egg, and I used 1/4 tsp Dijon mustard.
  • I did not have fresh bread, so instead of using a 1/2 slice of bread, I used 1/3 cup bread crumbs. They probably helped soak up a little of the extra egg moisture, too.
  • Check this out to see how to make bread crumbs yourself; from an older website of mine. It's a great use for stale bread, or the end pieces, if you don't like eating those.
  • My recipe made 7 crab cakes - enough to feed 2 or 3 people.
Key ingredients :)

Pretty asparagus, cut and rinsed.

Bread crumbs, mayonnaise, Old Bay, parsley, and mustard.

One of my pretty brown CSA eggs!

Everything mixed up!

Crab patties! I used my large cookie dough scoop to portion them out, then pattied them with my hands.

I sprayed a little oil on my skillet, and fried them for 5 minutes on each side.

Mmm.

Asparagus just takes a few minutes, so I cooked these while the last batch of cakes cooked. Just a little oil, garlic, and bit of salt.


So pretty, so tasty!

Tuesday, July 10, 2012

"Ginger" Cashew Chicken

So it seems I almost forgot to post about this one! Based off of a recipe I found using Epicurious from Bon Appetit - Ginger-Cashew Chicken. I put ginger in quotes in the title of this post because I didn't use any ginger. I made a smaller version of the recipe, using what I did have on hand (no chicken broth, no dry mustard, added mushrooms), and it made two servings. It came out pretty well - the biggest surprise was that the slight cooking of my embarrassingly old cashews made them taste quite a bit fresher! If you are sensitive to saltiness I would suggest adding less soy sauce. Here is my ingredient list:
  • 1 tbsp olive oil
  • 5 green onions (dense bottom part, used tops for second part)
  • 2 cloves garlic
  • 1 chicken breast
  • 3 celery stalks
  • 1 cup oyster mushrooms
     
  • 1 tsp olive oil
  • 1/8 cup water
  • 1/8 cup wine (I used a semi-sweet rose blush, same as in this post)
  • 1 tsp Dijon mustard
  • 1 tbsp soy sauce
  • 1 tbsp oyster sauce
  • 1/4 cup cashews
  • tops of green onions
  • 1/2 cup uncooked rice (cook while making the rest)
Here are most of my veggie ingredients - note that I separated out the base of the green onions from the tops

Sliced oyster mushrooms ready to go

Starting with the green onion bases

I added the mushrooms about halfway through the cooking time of the onions

Everything cooked up! Ready when chicken was just done to keep it juicy.

Here's the sauce...I thought this looked kind of cool :)

Everything - ready to eat!

On rice.


Very savory and tasty!

Tuesday, July 3, 2012

Second Helping: Penne Mozzarella

I wrote about the simplicity of Seventeen's Penne Mozzarella dish, and made it once again, this time with the intended spinach from my CSA. See again how glorious this basic meal is!

Beautiful spinach!

Pre-wilt spinach

Post-wilt spinach

Oh...

Mmm!

Beautiful.


And delicious!

Water Marble Nails

I'm not super into nail art. Well, I was, when I was in middle school. I used to make little flowers on my nails. I am, however, super into nail polish. It just comes in so many beautiful colors. I admit I'm a bit of a nail polish addict. Not totally obsessed, but not far from it. In any case, I came across this YouTube video which shows water marble nail art. It's like the coolest thing ever. There are a number of tutorial videos if you search "water marble nail art," but that one is pretty good. Think of the possibilities: school colors, team colors, holiday colors, whatever colors! Here's what I do:
  1. Base coat, then one or two coats of something light (white, pearl, silver, etc.)
  2. Fill a Dixie cup with room temperature water (or leave a Dixie cup out with water and let it become room temp ;) I like the Dixie cups because they are small; you don't have to use tons of nail polish and after it's done, just throw away.
  3. Get out some nail polishes, toothpicks, and a paper towel.
  4. You should wrap tape around your fingers...I didn't, and ultimately it took a few hand washings and lotioning my hands to help the nail polish peel off.
  5. Unscrew the nail polishes so they are ready to use, since it dries pretty fast.
  6. Drop them on, one at a time, or get crazy and try something new! Some will spread out better than others.
  7. Dip 1 (or 2, saves time and effort) nails in face down, then stretch them out under the water. Sometimes the nail polish "skin" will double up on the nail; it's pretty thin, so it's doesn't cause a lot of thickening, but it will look better without any overlap.
  8. Gather up the rest of the skin on the water with a toothpick and pull it out, wipe on paper towel...remove fingers and marvel!
Here's some photos from my first water marble try; I went with a cool pastel theme. I experimented a couple times on nails that were losing their polish to check things out, then prepared for the real deal. I used a pearly white as the base color and on top used: China Glaze - Re-Fresh Mint, Hello Kitty - Blueberry, OPI - Luck Lucky Lavender, and Essie - Lilacism.

This is what happens when you don't use tape :(

Still pretty sweet, though!

Most of the extra polish off. You can see a few spots on the side that the nail polish film didn't stick to. Probably from air bubbles.

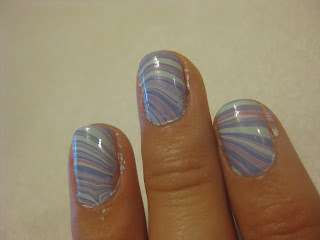
Pretty much all cleaned up! Love the stripiness on these.

On my thumb you can see where some of the film overlapped near the tip.

Right hand was a bit more abstract-looking.

Love this little wiggle...you can see a small spot that didn't get any film; you can see the pearly white undercoat.


So cute!


Definitely will do again :)