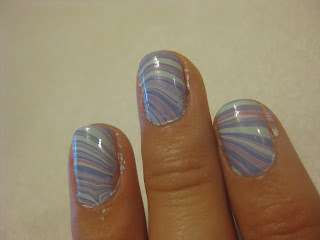
I'm not super into nail art. Well, I was, when I was in middle school. I used to make little flowers on my nails. I am, however, super into nail polish. It just comes in so many beautiful colors. I admit I'm a bit of a nail polish addict. Not totally obsessed, but not far from it. In any case, I came across this
YouTube video which shows water marble nail art. It's like the coolest thing ever. There are a number of tutorial videos if you search "water marble nail art," but that one is pretty good. Think of the possibilities: school colors, team colors, holiday colors, whatever colors! Here's what I do:
- Base coat, then one or two coats of something light (white, pearl, silver, etc.)
- Fill a Dixie cup with room temperature water (or leave a Dixie cup out with water and let it become room temp ;) I like the Dixie cups because they are small; you don't have to use tons of nail polish and after it's done, just throw away.
- Get out some nail polishes, toothpicks, and a paper towel.
- You should wrap tape around your fingers...I didn't, and ultimately it took a few hand washings and lotioning my hands to help the nail polish peel off.
- Unscrew the nail polishes so they are ready to use, since it dries pretty fast.
- Drop them on, one at a time, or get crazy and try something new! Some will spread out better than others.
- Dip 1 (or 2, saves time and effort) nails in face down, then stretch them out under the water. Sometimes the nail polish "skin" will double up on the nail; it's pretty thin, so it's doesn't cause a lot of thickening, but it will look better without any overlap.
- Gather up the rest of the skin on the water with a toothpick and pull it out, wipe on paper towel...remove fingers and marvel!
Here's some photos from my first water marble try; I went with a cool pastel theme. I experimented a couple times on nails that were losing their polish to check things out, then prepared for the real deal. I used a pearly white as the base color and on top used: China Glaze - Re-Fresh Mint, Hello Kitty - Blueberry, OPI - Luck Lucky Lavender, and Essie - Lilacism.
 |
| This is what happens when you don't use tape :( |
 |
| Still pretty sweet, though! |
 |
| Most of the extra polish off. You can see a few spots on the side that the nail polish film didn't stick to. Probably from air bubbles. |
 |
| Pretty much all cleaned up! Love the stripiness on these. |
 |
| On my thumb you can see where some of the film overlapped near the tip. |
 |
| Right hand was a bit more abstract-looking. |
 |
| Love this little wiggle...you can see a small spot that didn't get any film; you can see the pearly white undercoat. |
 |
| So cute! |
 |
| Definitely will do again :) |


No comments:
Post a Comment